Showing posts with label vegan. Show all posts

Thursday, January 24, 2013

cauliflower red lentil stew

A sunny Monday makes a happy Monday. (21/365)

Though I am trying to convince myself that I don't like winter, the sunny winter days that I have been enjoying lately are telling me otherwise. Vibrant blue sky during the day, piles of pure white snow glimmering in the sunlight, frosty tree tops, starry sky in the night - it is all so very beautiful. After the darkness of the past month or two, I am soaking up every moment of light and cherishing the warmth of the sun on my cheeks. Though my nose still gets bright red and my fingers frozen numb whenever I am outside, the days are finally getting longer and lightness is once again taking its place.

It is cold, though. Very much so. The past Saturday was the coldest this winter, the temperatures around -10F here. It isn't quite as bad anymore but there are days when the cold seems to be set in my bones. Those days, I'll take all the warmth I can find, from many layers of clothes to bowls of soup and mugs of tea.

cauliflower red lentil stew

I have been making this stew for a couple years now, and it is a family favourite. This is the stick-to-your-ribs kind of stew; hearty yet healthy, and spicy just the right way. Though I love this thick stew, it could also easily be turned into a soup by adding more stock. Whichever way, this is a wonderful meal to power you through the cold days.

The last time I made this was last winter, a few days after Christmas. A snow storm was passing through Finland so I made a pot of this stew for dinner, to warm us up. Many households in the area had lost electricity because of the storm and we were practically waiting to lose ours. Just as I turned off the stove, the stew ready, the power went out. That evening, we ate our dinner by candlelight, then camped close together on the couch.


Cauliflower Red Lentil Stew
adapted from Food52
serves 6 to 8

1 1/2 cups red lentils, picked over
warm water

2 tbsp olive oil
1 large onion, peeled and diced
3 garlic cloves, peeled and minced
2 tsp grated fresh ginger
2 1/2 tsp curry powder
1 tsp ground cumin
1 tsp ground coriander

2 to 3 cups vegetable or chicken stock
4 carrots, peeled and sliced
1 medium head of cauliflower, trimmed and cut into florets

+ plenty of fresh cilantro to serve


Measure the lentils into a bowl and cover with at least 2 inches of warm water; set aside.

In a large pot, heat the olive oil over medium heat and sauté the onion. When the onion starts to soften, add garlic, ginger, and spices; sauté for 1 minute. Pour the red lentils with the water into the pot and add the stock. Bring to a boil; turn down the heat to medium low. Add the sliced carrots and simmer, stirring occasionally, for 10 minutes. After the 10 minutes, stir in the cauliflower florets. Add more water, if needed. Cover and simmer for 20 minutes, stirring occasionally. The more you stir, the more the cauliflower florets are going to break down, though.

Salt to taste and serve with plenty of fresh cilantro.

Tuesday, September 18, 2012

peanut butter & honey granola + raspberry compote


Before the year in the States, I don't think I ever actually had tasted peanut butter. When I moved to the States, I didn't quite understand the hype about peanut butter; why people would eat it straight from the jar by the spoonfuls. And I certainly didn't understand peanut butter and jelly sandwiches. To me, they seemed more like dessert than lunch.

Then, well, I lived in the States for a year. I, too, started to eat peanut butter by the spoonfuls (Peanut Butter & Co. is my favourite brand). The peanut butters sold here in Finland aren't quite as good, though, and so I have given up on eating it by the spoonfuls. This is not to say that they would actually taste bad. It's just different enough for me to not want to eat it as it is. Instead, I use peanut butter in cooking and baking when the craving for it comes.

All this is to say that peanut butter makes great sandwiches. Not only are they delicious but they also keep in the room temperature for a while. The Scandinavian sandwiches - which consist of deli ham and cheese, and sometimes gravlax and/or eggs - do not. I'm not really a fan of PB&J, though. I prefer my peanut butter sandwich with a sliced banana and sometimes honey if I want it sweeter.


Now, on to the granola. Fragrant honey and flavourful peanut butter combine wonderfully in this granola, making it a grown-up and somewhat more sophisticated version of the loved sandwich. It is fitting for breakfast or as a snack, even lunch. Some chocolate chips could turn this either into a very indulgent breakfast or a healthy dessert.

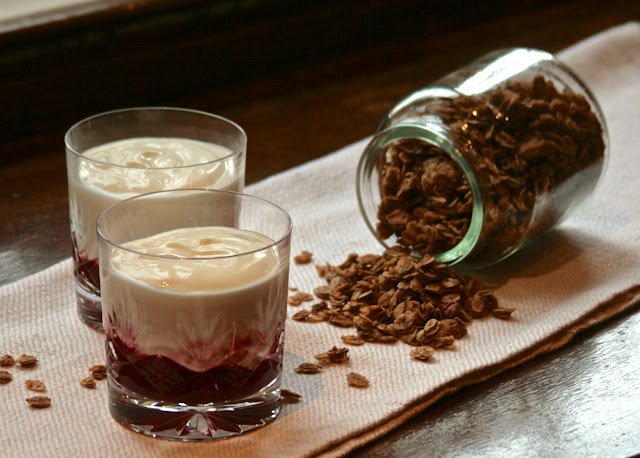
My favourite way to eat this is to top some plain Greek yoghurt with this granola and squeeze a little honey on top to enhance the flavour. However, as I started to think about peanut butter & jelly sandwiches while making this granola, I found myself craving the said sandwich. I, then, made a quick and easy raspberry compote from frozen raspberries to turn the sandwich into a yoghurt concoction of sorts. In case you are craving for a peanut butter & jelly sandwich as well, the recipe for the raspberry compote is also provided and highly recommended.


Peanut Butter & Honey Granola
makes 3 cups without any add-ins

1/4 cup canola oil
1/3 cup peanut butter
1/3 cup honey *
1 tsp cinnamon
1/2 tsp salt **

3 cups rolled oats
2 to 3 tbsp ground flaxseeds (optional)

Possible add-ins: 1/2 cup dry-roasted (or honey-roasted) peanuts; 1/2 cup dried fruit like raisins or banana chips; 1/2 cup dark chocolate chips


Preheat oven to 130C (275F). In a small saucepan, combine the oil, peanut butter, honey, cinnamon, and salt. Heat the mixture over medium heat until liquid and runny. Pour the peanut butter mixture over the rolled oats and flaxseeds, if using. Stir until everything is coated with peanut butter, then pour the mixture on a baking tray lined with parchment paper. Bake for about 40 minutes, flipping once or twice while baking, until the granola is golden and crunchy.

Let the granola cool to room temperature. Add any of the add-ins, if desired. Store in an airtight container.

* This amount of honey results in a slightly sweetened granola, which is what I prefer. If you like your granola sweeter, I recommend adding up to 1/4 cup brown sugar. However, I like to just squeeze more honey on top of the granola if I happen to want it sweeter.

** The peanut butter I used was slightly salted and I found the 1/2 tsp of salt was the perfect amount for my granola. The amount of salt might need adjustment depending on whether or not your peanut butter is salted and how you like your granola.


Raspberry Compote
makes 1 cup

2 cups frozen raspberries
2  to 4 tbsp sugar, to taste
1 tsp pure vanilla extract or 1/2 tsp vanilla bean paste
1 tsp potato starch

Slowly thaw the frozen raspberries in a saucepan over medium heat. When the raspberries are starting to get thawed, after about 3 to 5 minutes, add in the sugar and vanilla. When the raspberries are starting to get mushy, add in the potato starch and mix well. Bring the mixture to a boil, then take off the heat. Let it cool to room temperature before refrigerating. The compote will get thicker after cooling down and refrigerating.

This recipe makes a thick compote. For a runnier compote, I recommend adding only 1/2 tsp potato starch.

Wednesday, September 12, 2012

curried carrot coconut soup


Potatoes, carrots, turnips, beets, onions. They are all rather delightful, these root vegetables. They are rustic, homey and above all, comforting. Available through the year and making it even in the harsh conditions, root vegetables are a winner in my book. They are often also taken for granted; overlooked. Now, more than ever, I think it is time to start paying attention to these beautiful gems of the nature. Maybe it is because I come from a country of long and harsh winters. Root vegetables are what has kept this nation alive for centuries. (Just kidding. Kind of. Some credit also goes to rye bread.)

Soups, stews, curries. Mashed or whole. Grated, sliced, diced. Raw, roasted, boiled, even pickled. Appetizer, side, or a main. Even dessert in some cases. Are you as amazed as I am?


When the weather take a turn for the chillier temperatures, I start making soups and curries out of root vegetables. In the wintertime, there is always a bag of carrots lying around in case a quick and warming dinner is in order. I love how easy carrots are in that regard. Combined with some pantry staples such as lentils, coconut milk, and spices, they quickly will turn into a healthy, comforting dinner.

I love the combination of creamy coconut milk and the warming spices; the way they balance each other out and result in a delicious soup. This is the soup for those evenings when all you want is to curl up in a blanket with some soup and a cup of tea, and read a book or watch a movie you've meant to watch for a few weeks nows.


And, hopefully, you will stop and smile when you sip down the soup. Smile and start, though maybe slowly, being more aware and appreciate more those beautiful (in this case, orange) root vegetables that are waiting to be used.

Curried Carrot Coconut Soup
serves 6

2 tbsp extra-virgin olive oil
1 medium onion
2 garlic cloves
1 kg carrots

2 tsp curry powder
1/2 tsp ground cumin
1/4 tsp ground coriander
a pinch of ground chili pepper or red pepper flakes

100g red lentils, picked over and rinsed
1 litre vegetable stock
1 can coconut milk, divided


Peel and dice the onion and carrots. Peel and mince the garlic cloves. In a saucepan, heat the olive oil over medium heat. Add the onion, carrots, and garlic; sauté for a few minutes. Add the spices, and sauté for 30 seconds. Add the lentils and vegetable stock. Bring to a boil and simmer, over medium-low heat, until the carrots are tender and the lentils are falling apart, about 25 minutes.

Purée the soup using an immersion blender (or a blender) and thin the soup to the consistency of your liking with the coconut milk. (I used about a cup.) Season to taste with salt and pepper. Spoon what is left of the coconut milk on top of the individual servings.

Monday, September 3, 2012

quick and easy applesauce


The cool mornings are speaking of summer slowly turning to autumn. This is definitely my favourite time of the year. No matter where you look, the nature will amaze you with its astonishing beauty. The changing temperatures bring the changing colours with them. Forests will go from green to shades of yellow and red. Bright flowers will give way for the earthly hues of autumn.

"Autumn is a second spring where every leaf is a flower."
 - Albert Camus

While the mornings have been cool here in Finland, the days have so far still been pleasantly warm. It is a little confusing, actually, the need to pull on a jacket in the morning only having to take it off later on. It's as if, this year, we are given plenty of time to adapt to the change of the seasons and all the necessary preparations. For me, applesauce belongs to the category of "autumn preparations".


As soon as apples are in season, I start making applesauce. I love to top my bowl of oatmeal with a big spoonful of chunky applesauce - preferably one infused with cinnamon. Applesauce makes such a great topping for yogurt, oatmeal, and ice cream, and it's great on its own as a snack as well. I like mine slightly sweetened, but this recipe can easily be adjusted according to your preferences.

Quick and Easy Applesauce
makes about 1 cup, depending on the size of the apples

4 to 5 medium apples, peeled* and thinly sliced**
1/4 cup water
2 to 4 tbsp sugar or maple syrup (or to taste)

1/4 tsp ground cinnamon (optional)
1/2 tsp vanilla extract (optional)

Combine the apples, water and sugar in a saucepan. Cover and bring to a boil. Let simmer until the apples are tender, about 15 to 20 minutes, stirring a few times to make sure the apples get evenly cooked. Towards the end of the cooking, add cinnamon or vanilla to taste, if desired.


* You can just as well leave the peels on the apples; in that case, I recommend using organic apples. I love to leave the peels on with red apples, as that will result in nice, pink apple sauce. Of course, leaving the peels on means chunkier, more textured apple sauce.

** If you like your apple sauce truly chunky, try cutting one of the apples a little thicker. Thinly slicing the apples means that the apple sauce won't be completely smooth but it isn't exactly chunky either.